


If you’re using WordPress to power your website, there are probably tons of different reasons why you’ve made a good choice. It’s easy to understand, incredibly simple to work with, offers tried and tested functionality and probably the best one: it comes with a plethora of both free and premium plugins that make your work and life easier.
The WordPress Popup plugin is one tough act to follow as it offers unrivaled effectiveness and simplicity of use at the same time. If you’re considering switching over to Hustle Pro or starting its use from scratch, you’re definitely at the right place; keep reading to learn not only why you’re making the best decision for your website/business, but also how exactly you can set it up to ensure it works for you and not the other way around.
The WordPress Popup Plugin Overview: The What And The Why
Often described as the best friend of the WordPress marketer, Hustle offers a complete mastery over social sharing, opt-ins, slide-ins, and pop-ups. When you add to that the fact that it can be seamlessly integrated with more than 1000 third-party applications as well as that there’s absolutely zero code required to install and operate it, it becomes pretty clear why it’s so highly praised.

Simply put, what you’re really getting with Hustle is one very smooth operator that allows you to make use of all relevant marketing tools in one place and with just a few clicks of the mouse or pad. Hundreds of thousands of active users and more than one million downloads further testify to its reputability and reliability. Available for free on WordPress.org, this version is more than enough for most users.
On the other hand, upgrading to the Pro version with your WPMU membership unlocks the door to unlimited slide-ins, share bars, and pop-ups.


The Latest
Thanks to using Zapier, this WordPress popup plugin can connect to more than 1000 web apps and has approximately 20 built-in integrations. In previous versions, however, users were limited to only one active integration at a time. While this may not be a huge problem for Zapier users, but what happens if you wanted to use a single pop-up to grow multiple lists?
As of recently, you’re able to send contacts to Mad Mimi, ConvertKit, Aweber, MailChimp, and even Hubspot. Additionally, you can automate and drastically improve your workflow as a result if you set up Zaps for Ajira, Trello, Asana, and Slack. In other words, Hustle allows you to completely focus on growth by ensuring that every single channel is connected.


The latest version of this WordPress popup plugin didn’t receive a mere façade overhaul despite the fact that it looks superbly fresh, fly and modern. It comes with much more control over individual elements, as well as unrivaled performance available at your fingertips. Performing as good as it looks, Hustle comes with tighter code from Javascript to ensure flawless content rendering, as well as all the bells and whistles from page builder and cross-browser compatibility, to social network counter types, form fields and down to the colors.
The best part? Hustle’s latest iteration has been reconfigured to boast a little something for every single client out there regardless of size. Whether you’re a jumbo enterprise with elaborate configurations running multiple targeted campaigns at once, at the head of a non-profit passion project or a just starting a small business with big dreams for it in the future, this WordPress popup plugin is guaranteed to help you make those dreams a reality very soon.
Getting Gritty
While it does make converting readers into subscribers both fun and simple, there is an important consideration to remember before getting into all of its nooks and crannies – especially if you’re planning to upgrade from Hustle free (available on wordpress.org) to Hustle Pro.
Namely, please remember to delete the free version of Hustle from your plugin library before activating Hustle pro. This is due to different version numbers and should you see an error during the activation process, make sure you’ve deactivated and deleted the free plugin before giving it another go.
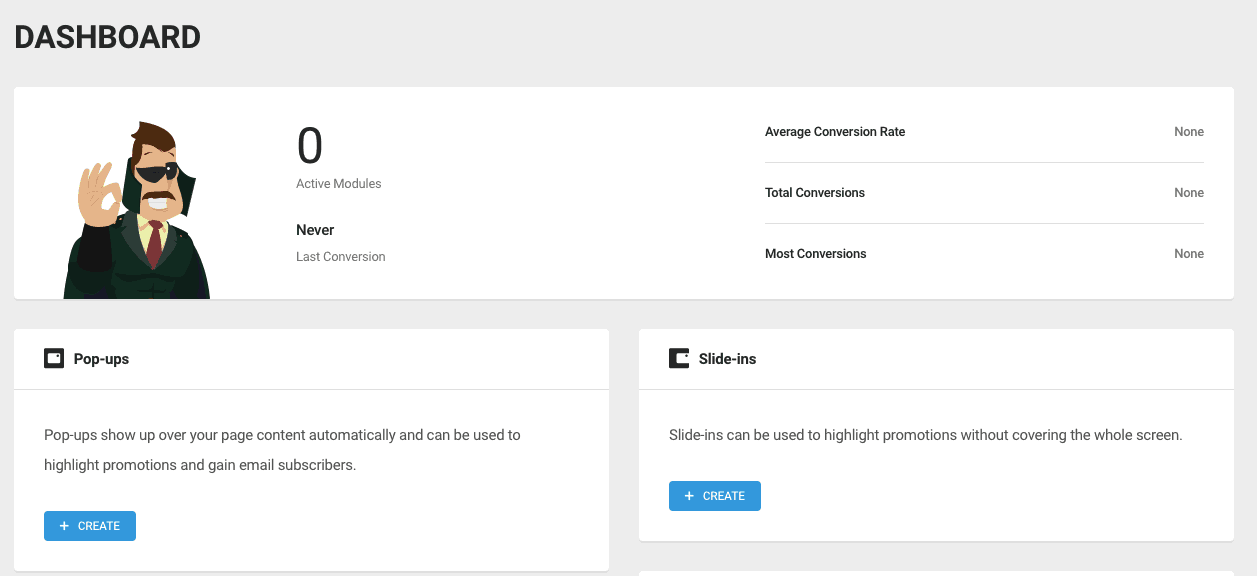
Getting down to the basics is best done by going to your WordPress admin menu in your admin dashboard and checking out the Hustle tab. One of the first things that will grab your attention will likely be Dashboard in front of you. There, you will be able to see all the information that you need within a glance, and you can get started with your pop-ups in a couple of clicks.

An original Hustle features, Opt-ins serve to create stylish email capture forms that can be connected to any of the supported newsletter services. You’re able to select different forms in which the opt-ins will be displayed, using a shortcode, after page or post content, a widget, a slide-in or a pop-up.
Other modules available, on the other hand, enable you to display other types of content, making them more flexible. These can be displayed with a shortcode, or as a slide-in. You also get the opportunity to add floating or inline social sharing prompts, for your visitors to share your content easily.
Setting Up Your Opt-In
The process of setting up your Opt-in starts by going to “Hustle,” and then “Pop-ups,” followed by “New Opt-in.” You can also do the same from your dashboard. The first panel that will pop-up (Surprise, surprise), will be to ask you for the purpose of your new pop-up. You can use the Opt-in option, or go ahead and use Informational one, to present your visitors with updates.
After you choose, it will ask for the name of your new pop-up. From there, you will see the opt-in and custom content module creation tools. This means that, while you’ll be able to see all of the settings on the same page, only the settings you’re currently working on will be ones visible to you.
Content Tab
In this section, you’re able to do several things: you can name your opt-in, and to design it to fit your site’s overall vibe, by providing you with options such as Custom Text, Featured Image, and the opportunity to add a Call-to-Action Button.
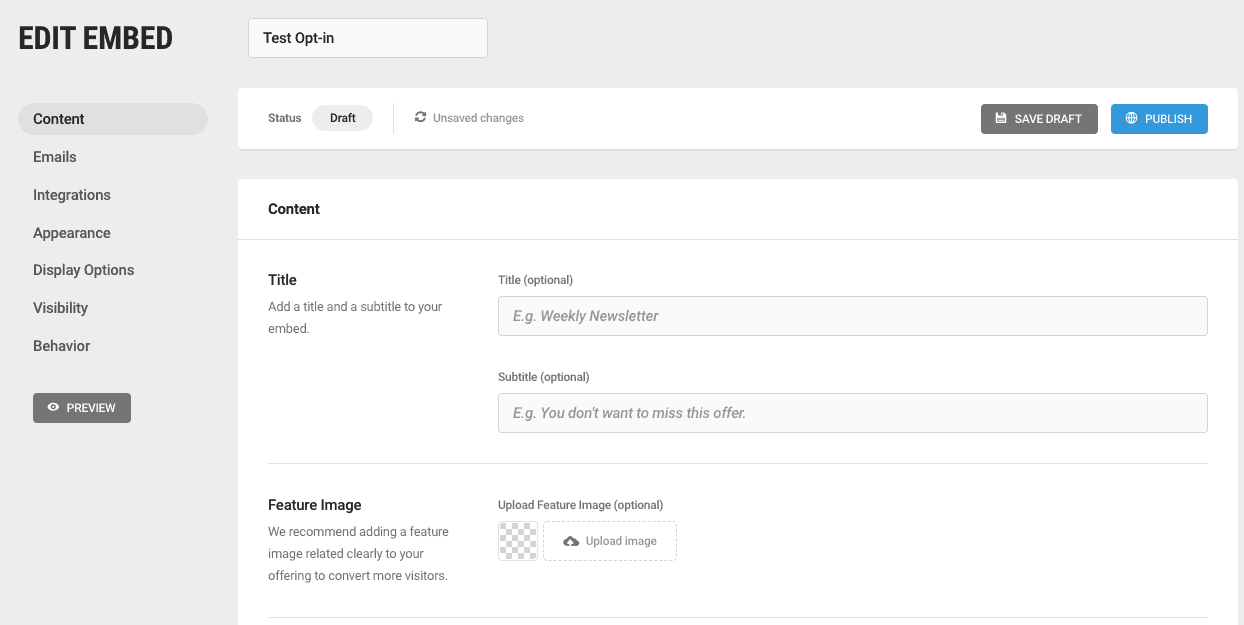

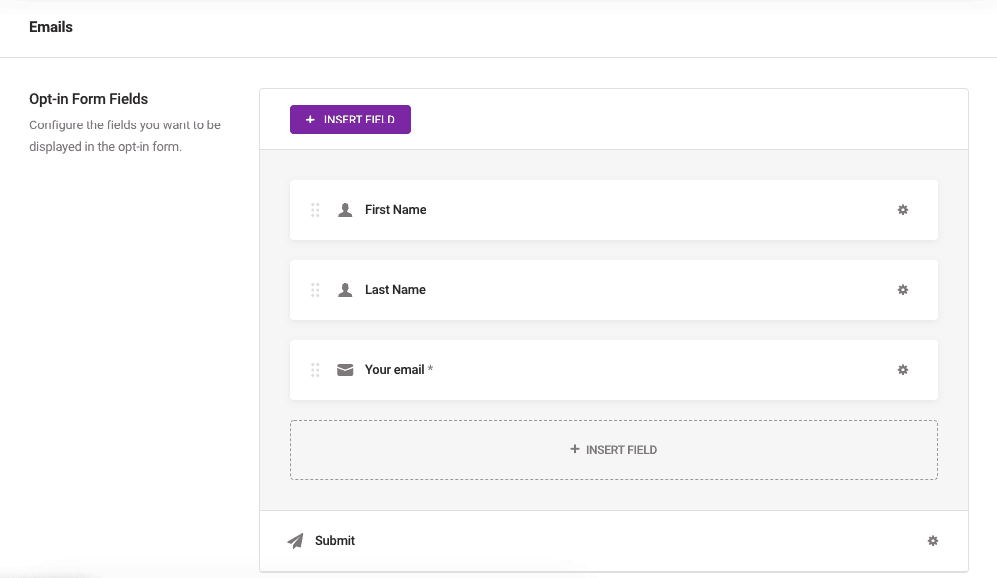
By going to the next page using the “Email” button, or by going down through the menu on the right, it will take you to add additional rules and options to ensure that your pop-up is bringing enough from your visitors to the table. Set up the form fields you want to have, set up what will happen after they click submit, and also, you can set up the plugin to send them an automated message after the form is filled in successfully.
Email Tab

Integrations
As mentioned before, this plugin comes with the opportunity for integration with other, 3rd party services. You can customize this under the “Integrations” tab, which you can find under “Hustle PRO” in your WP Dashboard.
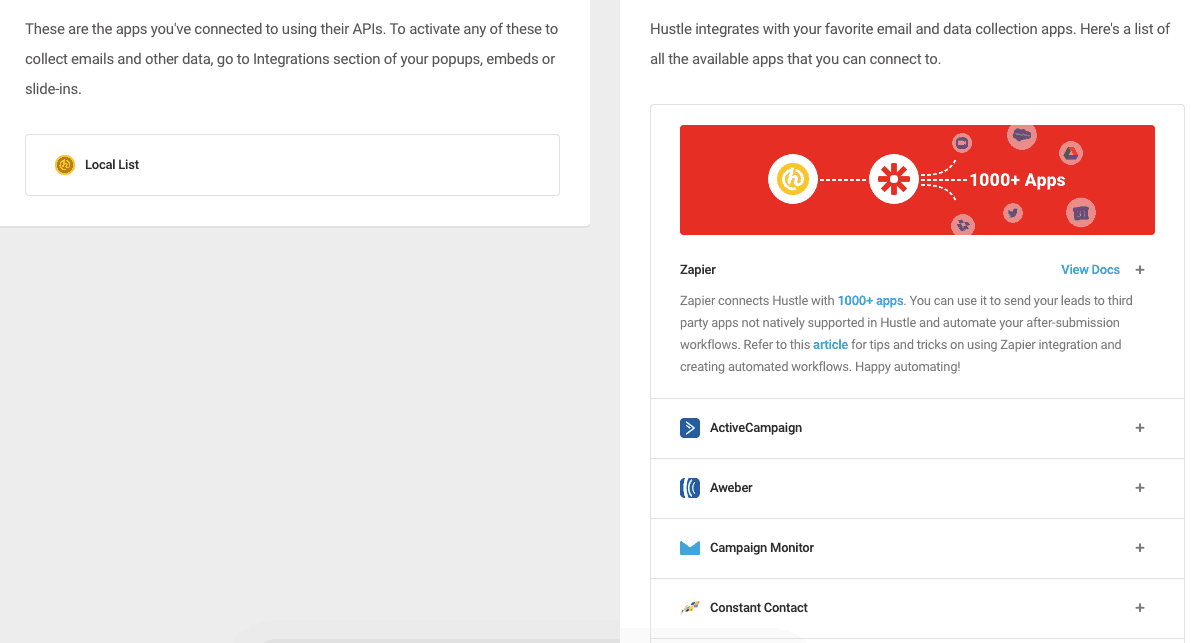

The integrations you have set up in place under that tab will appear in the Integration tab when you are setting up your pop-up.
Appearance
Appearance is the very next step in setting up your pop-up, and some may say that it is the most important one. Within this tab, you will get all the options you need to customize the pop-up to your liking. From layout and overall design, you can effortlessly pick the style that fits your website best. Choose the color palette, add shading, and make sure to set up a Custom size for your pop-up if you need it (while the plugin will make sure that the pop-up is responsive by itself). You are also free to add custom CSS if you need something custom made when it comes to your pop-up.
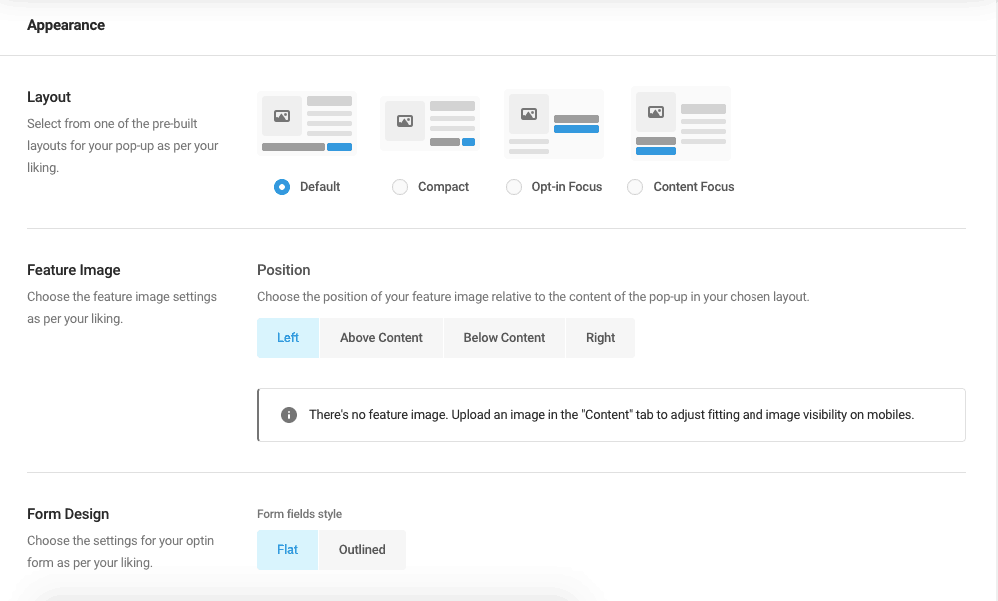

If you are not entirely sure whether you would be happy with your choices here, you can always use the preview button which you can find on the left. It will present you with a result of your selection so that you can make necessary adjustments.
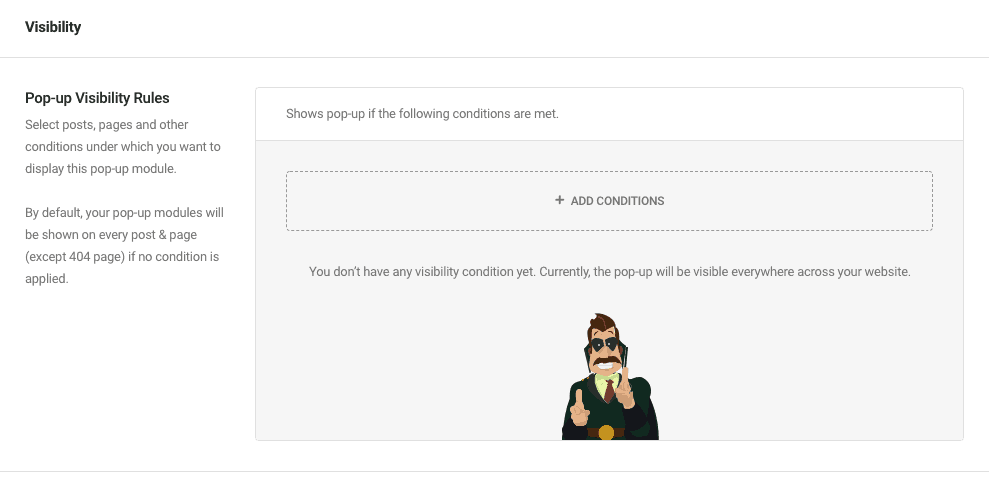
Visibility
The next tab is all about the pages you want to present your pop-up on. If you are looking to have the pop-up on every page of the site, don’t add any rules. If you would like to exclude some pages, you’ll have to set up the rules. Adding rules means selecting which page you would like your pop-up to show up on. You can effortlessly select that with just a couple of clicks.

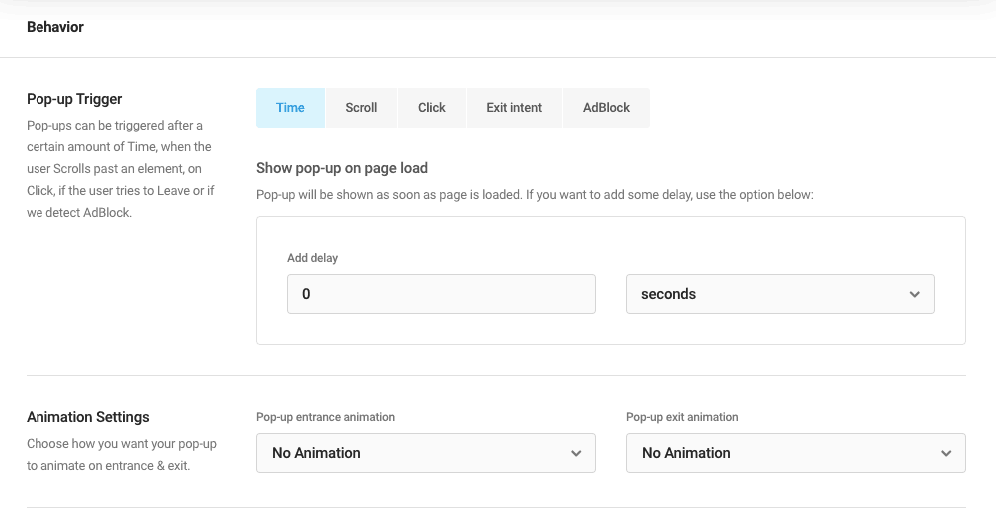
Behavior
Last, but not the least important option available to you is the behavior tab. Under it, you can set needed conditions under which you would like your Opt-in to operate. Set up the needed triggers, animations for your Opt-in, and closing behavior among other things. This will enable your pop-up to behave the way you want it to, and in a way that will get the most emails out of your customers.

With it, your pop-up is ready. Use the preview once again to check if you are happy with the result, and then hit publish to start collecting emails.
Slide-in and Embed
Next option in your Dashboard is the Slide-in, which is just another small demonstration of what the astonishing WordPress popup plugin that is Hustle enables you to do. This option works pretty much the same as setting up the pop-up, so all you need is to follow the steps explained above. Again, you’re able to choose specifically on which posts and pages your slide in is to appear. Adjusting triggers and other specific settings for the slide-in are also present, and after you can set all the specific conditions.
Next, you’ve also got Embed. Operating on all the same options as Opt-in and Slide-in, you can rely on the same process for setting it up. The only difference here is, that your Embed Opt-in can be displayed basically anywhere on your site if you use a shortcode.
Social
Social Sharing, on the other hand, has just the right options you need to add floating sharing buttons on your website. Head on to the Social part of your dashboard, and click to add new. Add a name, and get on to creating it.
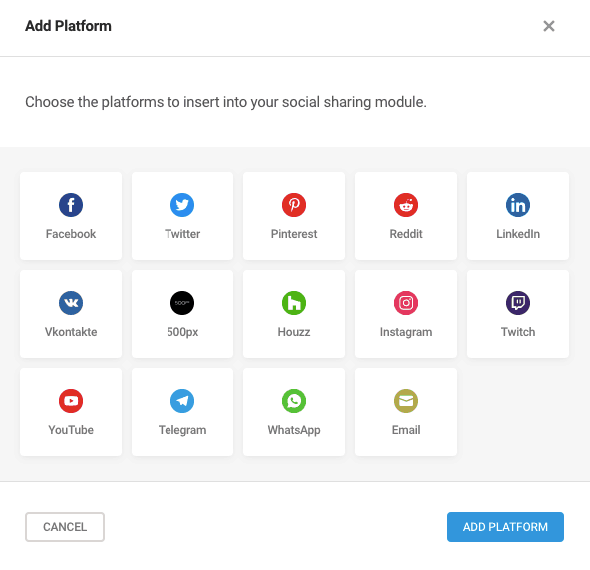
Services
Services is the first stop when creating these social media sharing buttons. Here, you will be able to turn on the counter, which will display the needed stats for you. And, of course, here is where you select the platforms you want to have in your pop-up. Simply select the ones you want to have, that is all you have to do.

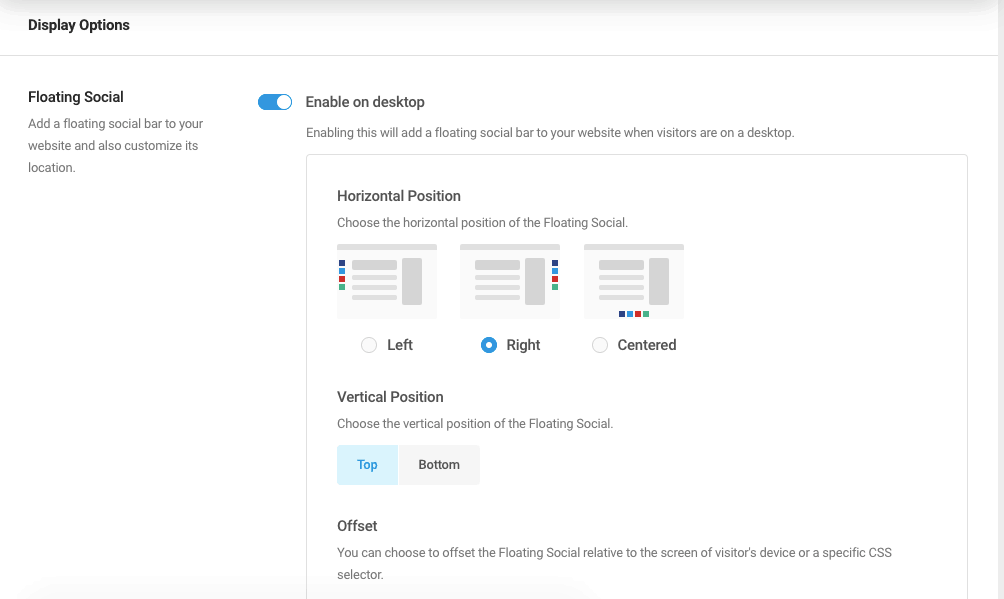
Display Options
While this one is rather self-explanatory, there are a couple of important things to mention. Within this tab, you will be able to set up the position of your floating social share buttons, enable them or disable them on the mobile preview, and use it as a widget or a shortcode.

Appearance
Next, again, you have the appearance tab. Within this tab, you can ensure that the social media icons will match the overall vibe of your website. Set up the style of the icon, and tweak the colors if you want them to match the overall design of your site.
![]()

After it, before you hit publish, you should also get through the visibility options, and ensure that this social share shows where you want it to show!
Using This WordPress Popup Plugin To Create Custom Content Modules
As aforementioned, custom content modules such as Embed and Slide-in, in this WordPress popup plugin pretty much work the same way as opt-ins. As a result, they allow you to do much more than just capture emails. In other words, your imagination is the only thing that limits the various uses for custom content modules.
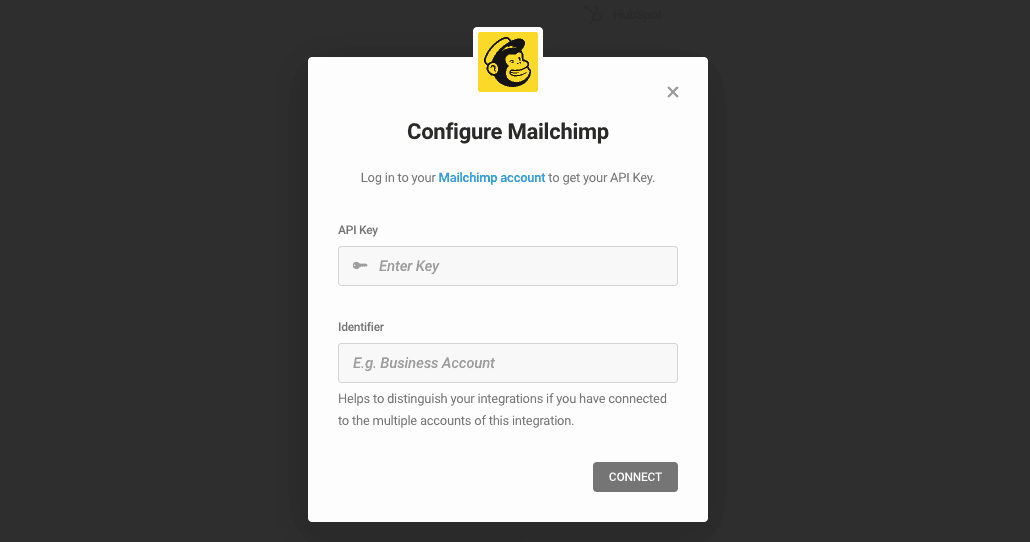
It’s the Integrations section that’s really interesting in this WordPress popup plugin. First, you can fiddle around with finding your MailChimp API; in order to do this, you’ll need to log into your MailChimp account and click on your name in the upper right-hand corner of the screen. Then click “Account” and in that tab, hit the “Extras” tab – this is where you’ll find your API key. In case you don’t have one, click “Create A Key” and you’ll be on the receiving end of one in literally no time.

If we’re talking about integrating MailChimp groups, on the other hand, the process is a tad different. After you ensure you’re logged in, go to the Navigate your Lists tab instead and click the drop-down to select Manage Subscribers. Hit Manage Subscribers again on the new page and then select Groups, followed by Add New. At that point, simply add information about your groups and save. Then it’ll be time to return to Hustle, click “Get Lists” right beside your API key field, and you’re done.
In case you’d like to connect to Constant Contact, you first need to select it as the email provider, after which you’ll see a message in the widget that will read: “Connect the Constant Contact integration by authenticating it using the button below. Note that you’ll be taken to the Constant Contact website to grant access to Hustle and then redirected back.” After clicking on “Authenticate” in the message, you’ll arrive at the login screen of Constant Contact and then a permission screen after you log in. In order to connect Constant Contact to Hustle simply click “Allow” and your unique key will automatically be added. When you’ve connected successfully, all of your Constant Contact lists will be available in a drop-down menu.
The more tech-savvy among you may ask, “But, what about finding my Campaign Monitor or Mad Mimi API?” Well, you’re in luck because these happen to be among the simplest mail service integration within this WordPress popup plugin. When it comes to the former, it’s as easy as logging into your Campaign Monitor account, then going to “Manage My Account” (you’ll need to click your avatar), and then clicking on “Manage API keys.” This will get you to the page on which your API key will be located, and all you need to do is to basically copy it to your clipboard and then paste it in the appropriate field.
As for the latter, the process is nearly identical: you’ll need to log into your Mad Mimi account, go to the upper right corner of the screen and click the Account button, under Settings & Billing choose the API tab in the right panel and basically copy your Secret API Key before you paste it in the appropriate field within Hustle. That’s it.
So, Let’s Sum It All Up
Hustle is basically a WordPress popup plugin that comes with countless nifty and useful features that are specifically designed to allow you to effortlessly gather email addresses of all of your site visitors and then build your email list. Using it is as simple as integrating it with your email marketing tool, which will then allow you to send automated emails to your entire email list. You’re able to install it with minimum hassle on any online store, blog or website by simply adding its tracking code, or if you don’t want to bother with all that, you can also install it via a direct plugin for Shopify, Magento and, of course, WordPress.

One of the single best features of this WordPress popup plugin is the fact that it not only lets you test different variations of your popups but this process helps you better understand and then choose and put into action the one that drives up your conversion rate the most. The way that it does that is that it enables you to customize every single aspect of your popup you can think of, including the style, font, colors and the like with only a few simple taps or clicks of the mouse. Then comes the piece de resistance: each popup can showcase detailed analytics about its performance, letting you make a more educated and beneficial decision. The best part? It’s equally useful to large enterprises, startups entrepreneurs, and bloggers alike.
Conclusion?
In other words, the biggest reasons for turning your attention to this remarkable WordPress popup plugin include, but are not limited to, helping you turn visitors into leads, helping you improve marketing ROI, getting more sign-ups, getting more subscribers, dramatically reducing your bounce rate and at the same time, similarly improving your conversion rate.
The ways in which it enables you to achieve the aforementioned encompass an easy management dashboard, conversion rates overview, viewing submissions straight through WordPress, tracking how many times opt-ins, slide-ins, and pop-ups are displayed, powerful conditions for targeting your audience, smooth display animations, a built-in designs editor for simple customization, 1 free social share bar, 1 free custom content ad, 1 free email opt-in, embeds/widgets/slide-ins/pop-ups and after post opt-ins, analytics, the fact that it overcomes Adblockers, Recaptcha Spam Warrior, Exit Intent Technology and Targeted Display Settings.
Simply put, Hustle Pro is a wildly effective WordPress popup plugin; as a matter of fact, it wouldn’t be an understatement to say that it’s pretty much the only plugin you’ll need to transform your site visitors into loyal subscribers, leads and ultimately customers. It was designed to be super-smooth, effective, easy to use, and provide quick results, making it an ideal all-rounder and a one-stop-shop for all of your pop-up needs.