Remote notarization has transformed how individuals and businesses handle important legal documents. Instead of traveling to a physical office, you can now verify your identity and sign documents securely online from your home or workplace. While the process is convenient, it still follows strict legal and security standards designed to protect all parties involved.
TLDR: An online notary platform allows you to notarize documents remotely through a secure audio-video session. The process typically involves creating an account, uploading your document, verifying your identity, meeting with a commissioned notary online, and receiving a digitally notarized file. Preparation is essential: have a valid ID, strong internet connection, and unsigned documents ready. By following each step carefully, you can complete your first remote notarization smoothly and confidently.
Understanding Remote Online Notarization
Remote Online Notarization (RON) is a legally recognized process in many jurisdictions that allows a commissioned notary public to notarize documents through a secure online platform. Instead of signing paper documents in person, the signer and notary connect via live audio-video technology.
The platform uses identity verification tools, tamper-evident digital seals, and recorded sessions to ensure integrity and compliance. The goal remains the same as in-person notarization: to deter fraud and verify the identity and willingness of the signer.
Before proceeding, confirm that remote notarization is legally accepted for your document type and in your state or country.
Step 1: Choose a Reputable Online Notary Platform
Your first step is selecting a trustworthy provider. Not all platforms operate equally, so consider the following criteria:
- Compliance: The platform must comply with your jurisdiction’s laws.
- Security: Look for encryption, identity verification protocols, and secure document storage.
- Availability: Some services offer 24/7 access to licensed notaries.
- Transparent pricing: Fees should be clearly stated upfront.
- Customer support: Accessible assistance if technical issues arise.
If you are comparing multiple platforms, use a structured approach:
| Feature | Platform A | Platform B | Platform C |
|---|---|---|---|
| 24/7 Notary Access | Yes | No | Yes |
| Identity Verification Methods | ID Scan and Knowledge Questions | ID Scan Only | ID Scan and Biometric Check |
| Average Session Time | 15 Minutes | 30 Minutes | 20 Minutes |
| Price Range | Moderate | Low | Moderate to High |
| Document Storage | Encrypted Cloud Storage | Limited Storage | Encrypted with Audit Trail |
Take the time to read user reviews and verify licensing information before selecting a provider.
Step 2: Create Your Account
Once you choose a platform, you will need to create an account. This usually involves:
- Providing your full legal name
- Entering your email address
- Creating a secure password
- Verifying your email
Use accurate personal information that matches your government issued identification. Any discrepancy could delay the notarization process.

Some platforms may request preliminary identity verification at this stage, while others conduct it immediately before the notarization session.
Step 3: Upload Your Document
After registration, you will upload the document that requires notarization. Common examples include:
- Power of attorney
- Affidavits
- Real estate documents
- Business agreements
- Consent forms
Important: Do not sign the document before the session unless specifically instructed. Many documents must be signed in the presence of the notary during the live video session.
Ensure that:
- The document is complete and free of blank fields.
- All pages are included in a single file if possible.
- The text is clear and legible.
The platform will typically guide you in placing digital signature and notary seal indicators in the appropriate sections.
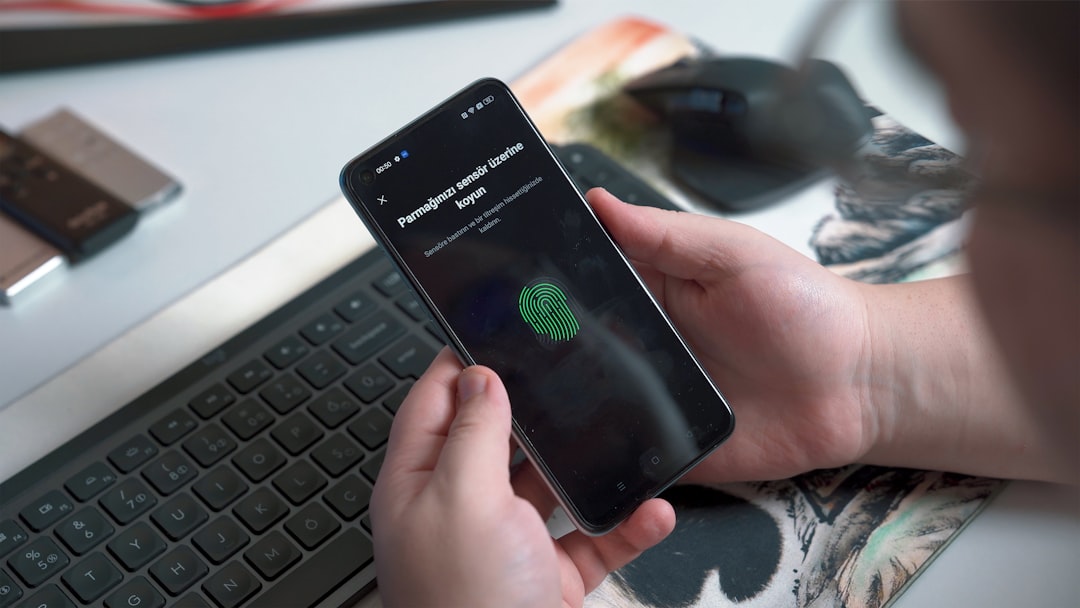
Step 4: Complete Identity Verification
Identity verification is one of the most critical components of remote notarization. Online platforms use multi-layered security procedures to confirm that you are who you claim to be.
Verification typically includes:
- Credential analysis: Uploading or scanning your government issued ID.
- Knowledge based authentication (KBA): Answering personal history questions.
- Biometric comparison: Matching your face to your ID photo.
You must have a valid, unexpired photo identification, such as:
- Driver’s license
- Passport
- State identification card
Answer all questions carefully. Failing identity verification may require you to restart the session or use an alternative verification method.
Step 5: Join the Live Audio Video Session
After verifying your identity, you will enter a live video session with a commissioned notary public. This step closely resembles an in-person meeting but occurs entirely online.
During the session, the notary will:
- Confirm your identity again visually
- Ask whether you understand the document
- Ensure you are signing willingly
- Witness your electronic signature
You will need:
- A stable internet connection
- A device with camera and microphone
- A quiet, well lit environment

The session is typically recorded and securely stored as part of the official notarial record.
Step 6: Electronically Sign the Document
When instructed by the notary, you will apply your electronic signature. The platform will indicate exactly where to sign and may require you to click specific signature tags.
Electronic signatures used in notarization platforms are legally binding and secured through encryption technology. After you sign, the notary applies a digital notarial seal and electronic signature.
This seal is tamper-evident, meaning any alteration to the document after notarization will be detectable.
Step 7: Receive and Store Your Notarized Document
Once the session concludes, you will receive your notarized document electronically. This is typically provided as a secure PDF file with an embedded digital certificate.
Best practices for document storage include:
- Downloading the file immediately
- Saving backups in secure cloud storage
- Sending copies only through encrypted email when necessary
- Confirming acceptance requirements with the receiving party
If a physical copy is required, print the document from the finalized PDF. The digital certificate should remain valid and verifiable.
Common Mistakes to Avoid
First-time users often encounter avoidable issues. Be mindful of the following:
- Signing documents before the live session
- Using expired identification
- Having poor lighting during ID verification
- Leaving blank spaces in the document
- Using an unstable internet connection
Preparation significantly reduces delays and ensures a smooth process.
Security and Legal Considerations
Online notarization platforms are designed with strict compliance measures, including encrypted data transmission, multi-factor authentication, and digital audit trails. Still, you should take responsibility for your own cybersecurity practices:
- Use a private and secure internet connection.
- Avoid public Wi-Fi networks.
- Enable two-factor authentication on your account.
- Keep your login credentials confidential.
Additionally, confirm whether the recipient of your document accepts remote notarization. Some international or specialized institutions may require specific formats.
Final Thoughts
Your first remote notarization may feel unfamiliar, but the process is structured, secure, and designed to protect both the signer and the receiving party. By selecting a reputable platform, preparing your documents in advance, completing identity verification carefully, and participating attentively in the live session, you can complete the process efficiently and confidently.
Online notarization combines legal rigor with technological convenience. When handled responsibly, it provides a reliable alternative to traditional in-person notarization, saving time while maintaining the highest standards of identity verification and document integrity.